So now you have a group of willing moms ready to tackle your very own co-op preschool. What now? What will you teach? How can you make sure that everyone doesn't teach the same topic? How can you ensure that the curriculum is well-rounded and will prepare them for kindergarten?
Here are a few things that I've tried (in order from least to most effective):
1. Purchasing a pre-made curriculum, like Joy School or Mother Goose. I personally am not a fan of pre-made curricula. While the concept sounds great to have your whole lesson plan provided for you, I felt like it robbed me of spontaneity and creativity. While paltry in comparison to community preschool programs, I also have always balked at the dues that these programs charge. While I acknowledge that the dues are for the time and effort in creating the curricula, it's still us moms doing all the work going to the craft store and library, coloring flannel board figures, singing and dancing in front of the children, and cleaning up afterwards. It just doesn't seem right to pay just for the ideas when I find that the average mom interested in participating in a co-op preschool to be just as creative in their lesson planning than any professional curriculum designer.
Pros: No brain power required. You still have to do all the work of teaching, but you don't have to think about what to teach or how to teach it.
Cons: The biggest reason of all that I choose co-op preschools over community programs is for the greater part I get to play in my kids' education. They grow up and go off to the big school soon enough, I don't want some paid preschool designer telling me what I have to teach my own kids. The second thing is money. I love to think of all the money I've saved over the years by not sending my kids to a community preschool and I have no desire to pay someone just for their ideas while I still do all the work.
2. Random: My first few years after breaking out of a pre-purchased curriculum we tried the random approach where everyone just taught whatever they felt like teaching. At the beginning of the year you would just come with a list of ideas of things you might like to teach, then during the scheduling you would call out what week you wanted and what topics you were taking.
Pros: No fuss. No one has to put a lot of time and effort into preparing anything advance and because people were choosing their own topics the teachers tended to choose things that were meaningful to them or to their child.
Cons: No rhyme or reason or guarantee of well-roundedness. It was also discouraging when someone else would "steal" your topic ideas.
3. Letter-of-the-Week: This is a fun, straight-forward curriculum I prefer to use for 2-3 year olds. Each week has a letter assigned to it (in order A-Z, or in your own pre-determined order) and teachers find topics based on that letter. An apple lesson for A, a bird lesson for B, cars for C, etc.
Pros: It's easy to find ideas on the internet. It's easy to reinforce at home and you always know what's coming next.
Cons: Diversity--because each letter is so open-ended, it's quite likely that you will get a whole lot of science based lessons and not much else (since that's what people tend to choose on their own). While this isn't a problem per se, it is the reason why I recommend this approach for 2-3 year olds and not for a Pre-K curriculum.
4. Teacher Topics: Each teacher is assigned a topic (science/nature, heroes, character, music, art, geography, health) and they become the teaching "experts". Each of their lessons will be focused within their topic. For instance, I love to teach about heroes, so my lesson plans through the year were focused on different heroes (Helen Keller, George Washington, Martin Luther King, Jr., Christopher Columbus, etc.). It was fun for me looking ahead to different heroes I could teach about and the kids knew that at our house that's what they learned about.
Pros: I loved how the teachers were teaching to their passions and it showed in their creative, enthusiastic lessons. It's nice to know what your focus is and it's easy to get in a rhythm for teaching that topic. I also really like how it ensures a full diversity of topics being taught to the children.
Cons: I found that towards the end of the year it felt somewhat limiting to my creativity to only teach on that one topic.
5. Yearly Lesson Outline: This is when a specific topic is assigned to each day of preschool through the year. The planner who makes the outline (in our case, that would be me) makes sure that the topics are diverse, but with a semblance of continuity when possible. At the preschool planning meeting a calendar with topics is given to each teacher, then divided into 6-week segments (or however many students are in the group) and each person picks a week in each segment.
This is what we've been doing the last couple of years and I've been surprised at the positive response that it's received. I was worried that people would not want to be told what to teach about (after all that's why I didn't like the pre-purchased curricula mentioned earlier), but there are a couple of differences that make it a lot more palatable. The main difference being that instead of being told step-by-step exactly what they were supposed to through every minute of the lesson (like the pre-purchased curricula), the teachers still get to utilize their own ideas and creativity for teaching the topic without the stress of picking a topic (which is often the hardest part). I also think that people like that they're not getting assigned a topic straight up, but they still get to choose within each segment through the year.
Pros: People really, really like having the topic known in advance. Second, if designed such, it is ensured to be a well-rounded curriculum with a wide range of topics.
Cons: Someone has to do the work in advance of compiling the calendar and the topics. (You'd be welcome to use my own lesson plan outlines listed on the left, but you'd still have to go through and change the dates to accommodate your own group).
Showing posts with label getting started. Show all posts
Showing posts with label getting started. Show all posts
Sunday, September 13, 2009

Wednesday, September 9, 2009
Supplies You'll Need for a Co-op Preschool
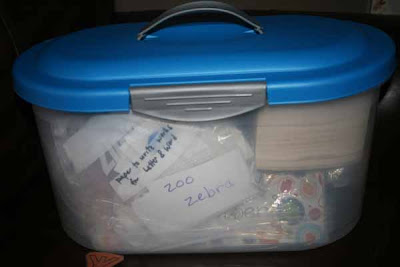
First and foremost, you will want all of your supplies to be contained in a durable, portable container, so that they can be easily passed from house to house (along with the preschool board).
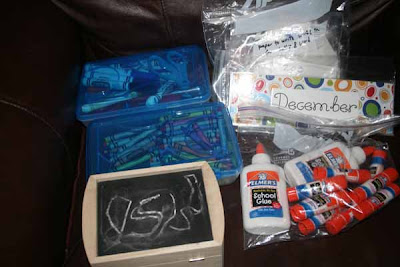
Crayons, glue (liquid and sticks), scissors, and markers are all necessities. In addition we have a counting box where we put a number of objects into each lesson and have the "Counting Box Helper" help us to count (and write the number on top of the box). In addition, ours contained the pieces to the calendar, chart, letters of the day, and songs from the Preschool Board , plus the mats for circle time (see below).
On top we have the mats that they sit on during circle time. This year it was dishtowels that the kids had decorated.

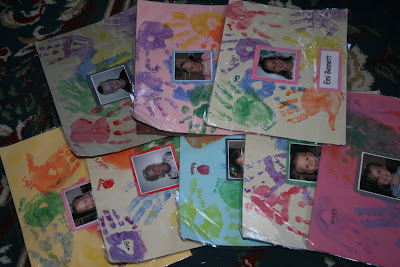
Last year it was laminated pieces of cardstock they had decorated with handprints and a picture. The dishtowels took up a little more room, weren't quite as cute, but were much more durable than the laminated mats. Whichever you prefer is great!
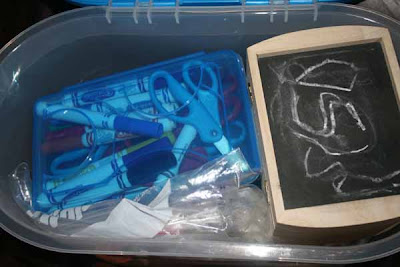
Here is what it looked like before the mats were added on top.

Crayons, glue (liquid and sticks), scissors, and markers are all necessities. In addition we have a counting box where we put a number of objects into each lesson and have the "Counting Box Helper" help us to count (and write the number on top of the box). In addition, ours contained the pieces to the calendar, chart, letters of the day, and songs from the Preschool Board , plus the mats for circle time (see below).

On top we have the mats that they sit on during circle time. This year it was dishtowels that the kids had decorated.

Last year it was laminated pieces of cardstock they had decorated with handprints and a picture. The dishtowels took up a little more room, weren't quite as cute, but were much more durable than the laminated mats. Whichever you prefer is great!

Here is what it looked like before the mats were added on top.

Making a Preschool Board
Making a portable preschool board is one of the best ways to give a sense of continuity from one house to another in a co-op preschool. Start off with a sturdy tri-fold board and go from there.
You can use your creativity as far as details and how it looks, but each board should include similar elements as to what you see here: Calendar, Behavior Chart, Job/Helper Chart, Weather Chart, and Letter/Word of the Day.
You will want to make sure that each portion is individually laminated and firmly affixed to the board. Sticky back Velcro definitely seems to be the best way to affix removable pieces to the board.
You can use your creativity as far as details and how it looks, but each board should include similar elements as to what you see here: Calendar, Behavior Chart, Job/Helper Chart, Weather Chart, and Letter/Word of the Day.
You will want to make sure that each portion is individually laminated and firmly affixed to the board. Sticky back Velcro definitely seems to be the best way to affix removable pieces to the board.
 2008-2009 Preschool Board--made by Becca T.
 Top left: Song section--little squares with preschool favorite songs, laminated and with velcro on the back are drawn by the "Song Helper" and velcroed to the board
Bottom left: Weather Chart--"Weather Helper" goes through teddy bear's outfits and decides which one is best for the current weather, then chooses a label (in this picture he's wearing a rain slicker and the label says "rainy")
Top middle: Calendar--each number has been laminated and had velcro attached. The "Calendar Helper" adds the right number to the calendar and then the teacher reviews which MONTH, DATE, DAY OF THE WEEK, and YEAR it is.
Bottom middle: Letter and word of the day: "Letter Helper" is told which letter is the letter of the day and a few letter choices. He chooses the correct letter (help if needed) and places it on the board. Have everyone practice saying the letter and its sound. If you have time you could practice writing it too. "Word Helper" places the word of the day on the board. Help the children sound out the word.
Top right: Behavior chart--all kids start on green and will get moved to yellow, then red with disobedient behavior. I usually even give a warning before even moving them to yellow and that threat alone is enough to curb the behavior. I've only ever moved someone to red once in the two years we've been using this system.
Bottom right: Helper chart--Jobs are affixed on one side and movable, laminated strips with each child's name are rotated through the jobs. (Communicate with the teachers how you want the names to move. We always just move each name down one job per preschool session, then the bottom name to the top.)
 2007-2008 Preschool Board--by Laura B.
 Left: Weather chart--"Weather Helper" picks the appropriately dressed child, a weather label, and then moves the thermometer to the approximate temperature
Top Middle: Word and Letter of the Day--"Letter Helper" is told which letter is the letter of the day and a few letter choices. He chooses the correct letter (help if needed) and places it on the board. Have everyone practice saying the letter and its sound. If you have time you could practice writing it too. "Word Helper" places the word of the day on the board. Help the children sound out the word.
Bottom Middle: Calendar--each number has been laminated and had velcro attached. The "Calendar Helper" adds the right number to the calendar and then the teacher reviews which MONTH, DATE, DAY OF THE WEEK, and YEAR it is.
Right: Helper chart--Jobs are affixed on one side and movable, laminated strips with each child's name are rotated through the jobs. (Communicate with the teachers how you want the names to move. We always just move each name down one job per preschool session, then the bottom name to the top.)
Bottom across: Behavior chart--inside each pocket contains a card with four sections (2 on each side) Green, yellow, orange, red. All kids start on green and will get moved to yellow, then orange, then red with disobedient behavior. I usually even give a warning before even moving them to yellow and that threat alone is enough to curb the behavior. I've only ever moved someone to red once in the two years we've been using this system.
 Here are the little song circles that the kids would draw from.
Sunday, September 6, 2009
Emergency Contact Info
As part of your planning meeting, make sure you get emergency contact information from everyone.
You will want to collect:
1. Home address
2. Home phone number
3. Mom's cell number
4. Dad's work number
5. Email address
6. Child's birthday
After collecting them, be sure to type them all onto one sheet and distribute to everyone.
You will want to collect:
1. Home address
2. Home phone number
3. Mom's cell number
4. Dad's work number
5. Email address
6. Child's birthday
After collecting them, be sure to type them all onto one sheet and distribute to everyone.
Subscribe to:
Posts (Atom)